
The complete guide to using Foundry in your Ethereum project
We are going to learn how to use Foundry in your Ethereum project. We are going to learn how to install it, write unit tests in Solidity, install dependencies, compile contracts and deploy contracts.
In this tutorial, we are going to learn how to use Foundry in your Ethereum project. We are going to learn how to install it, write unit tests in Solidity, install dependencies, compile contracts and deploy contracts.
How to install Foundry and start a new project
To install Foundry, first we need to run this command:
curl -L https://foundry.paradigm.xyz | bashThen, it will prompt something like this:

As you can see, the next step is to tell your shell that a new command was added. To do that, we run the source comment followed by the path to your shell source file.
Just run the command that they give you or open a new terminal.
Once you've done that, you can run: foundryup:

And that's it! Everything you need is now installed.
To start a new project, first create a new folder and then move to that folder:
mkdir project-name
cd project-name
Once you've done that, you can run:
forge initThat will install all the files and folders you need to start creating your smart contracts and use Foundry.
After the project is initialized, you'll have the following files and folders in your project folder:
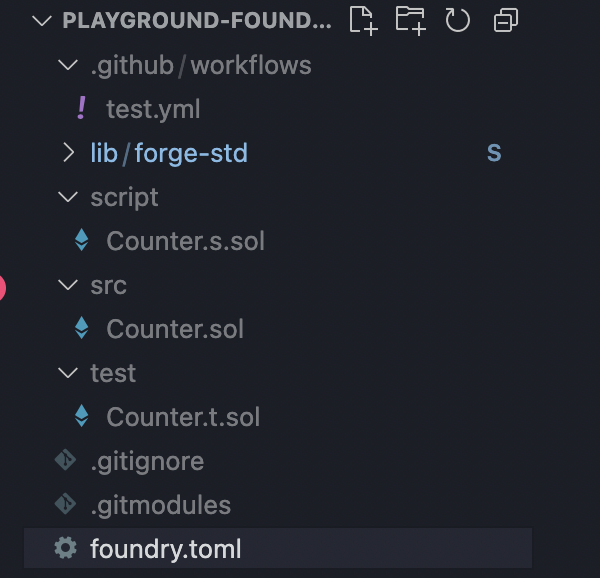
foundry.tomlis where you can configure Foundry and your project. You can configure the Solidity version, your Etherscan keys or the compiler.gitmodulesis where the dependencies installed are defined.gitignorelists the files ignored by Gittest/is where the test files livesrc/is where the code of the smart contracts livescript/is where you can define Solidity scriptslib/is where the code of the dependencies installed is.github/workflowsis where you can add Github actions that will run when you create or update a pull request.
The pre-installed actiontest.ymlwill run the unit tests and fail if the unit tests don't pass. You can configure Github actions to use that file so it requires the unit tests to pass before allowing pull requests to be merged.
Configuring VSCode
First, you need to install the VSCode Solidity extension to have syntax highlighting.
Foundry allows you to remap the path to import a dependency so it's easier to import. If you have remappings, you'll need to add all these remappings in a remappings.txt file. For that, run this command:
forge remappings > remappings.txtIt should be enough, but if you need additional configuration check out this page in the documentation.
How to install dependencies
If you want to use third-party smart contracts from services like Chainlink or OpenZeppelin, you'll need to install dependencies in your project.
Foundry uses Git submodules to install libraries so you can install public repository that has a smart contract in it.
To do that, we use the forge install command followed by the repository we want to install.
For example, if I want to install the Chainlink contracts, I run:
forge install smartcontractkit/chainlinkRunning that command will automatically create a commit and stage the files that were added/changed.
In the example above, I installed Chainlink so the commit message will be "Installed chainlink". You can add the --no-commit flag to the command if you want to disable that behaviour.
Then, you'll probably need to update your remappings to easily import the library. In this case, I added Chainlink so I need to add this line to the remappings.txt file:
@chainlink/=lib/chainlink/That, way, I tell Foundry that every time I import something that starts with @chainlink/ I'm actually importing from lib/chainlink/ (remember, the lib/ folder is where the dependencies code is)
Here, the path is simple so the remapping is short but on more complex paths, remappings can be extremely powerful and save you time.
How to create your smart contracts
Now that everything is set up, we can start writing the code of our smart contracts. To do that, we can just create our Solidity files in the src/ folder. You can create the files and folders you want inside of it.
Just don't put the smart contract code outside of the src/ folder or one of its subfolders, otherwise that file won't get compiled by Foundry.
How to compile your smart contracts
Once you created your smart contracts, you'll need to compile them before running unit tests on them or deploying them.
To do that, you can use the forge build command which will build all the smart contracts of your project, including the code of the libraries (if it's imported by your smart contracts).
The first time you build the smart contracts of your project, it will add 2 folders:
cachewhich is where Foundry will store values to improve the compiler speed the next time you compile the smart contracts codeoutwhich contains the compiled code in JSON files for each contract that was compiled
More information about the build command here.
How to write unit tests in Solidity
One of the biggest advantages (if not the biggest) is that you can write unit tests directly in Solidity and they are blazing fast. Here is a chart comparing the speed of the Foundry unit tests with the Hardhat unit tests:
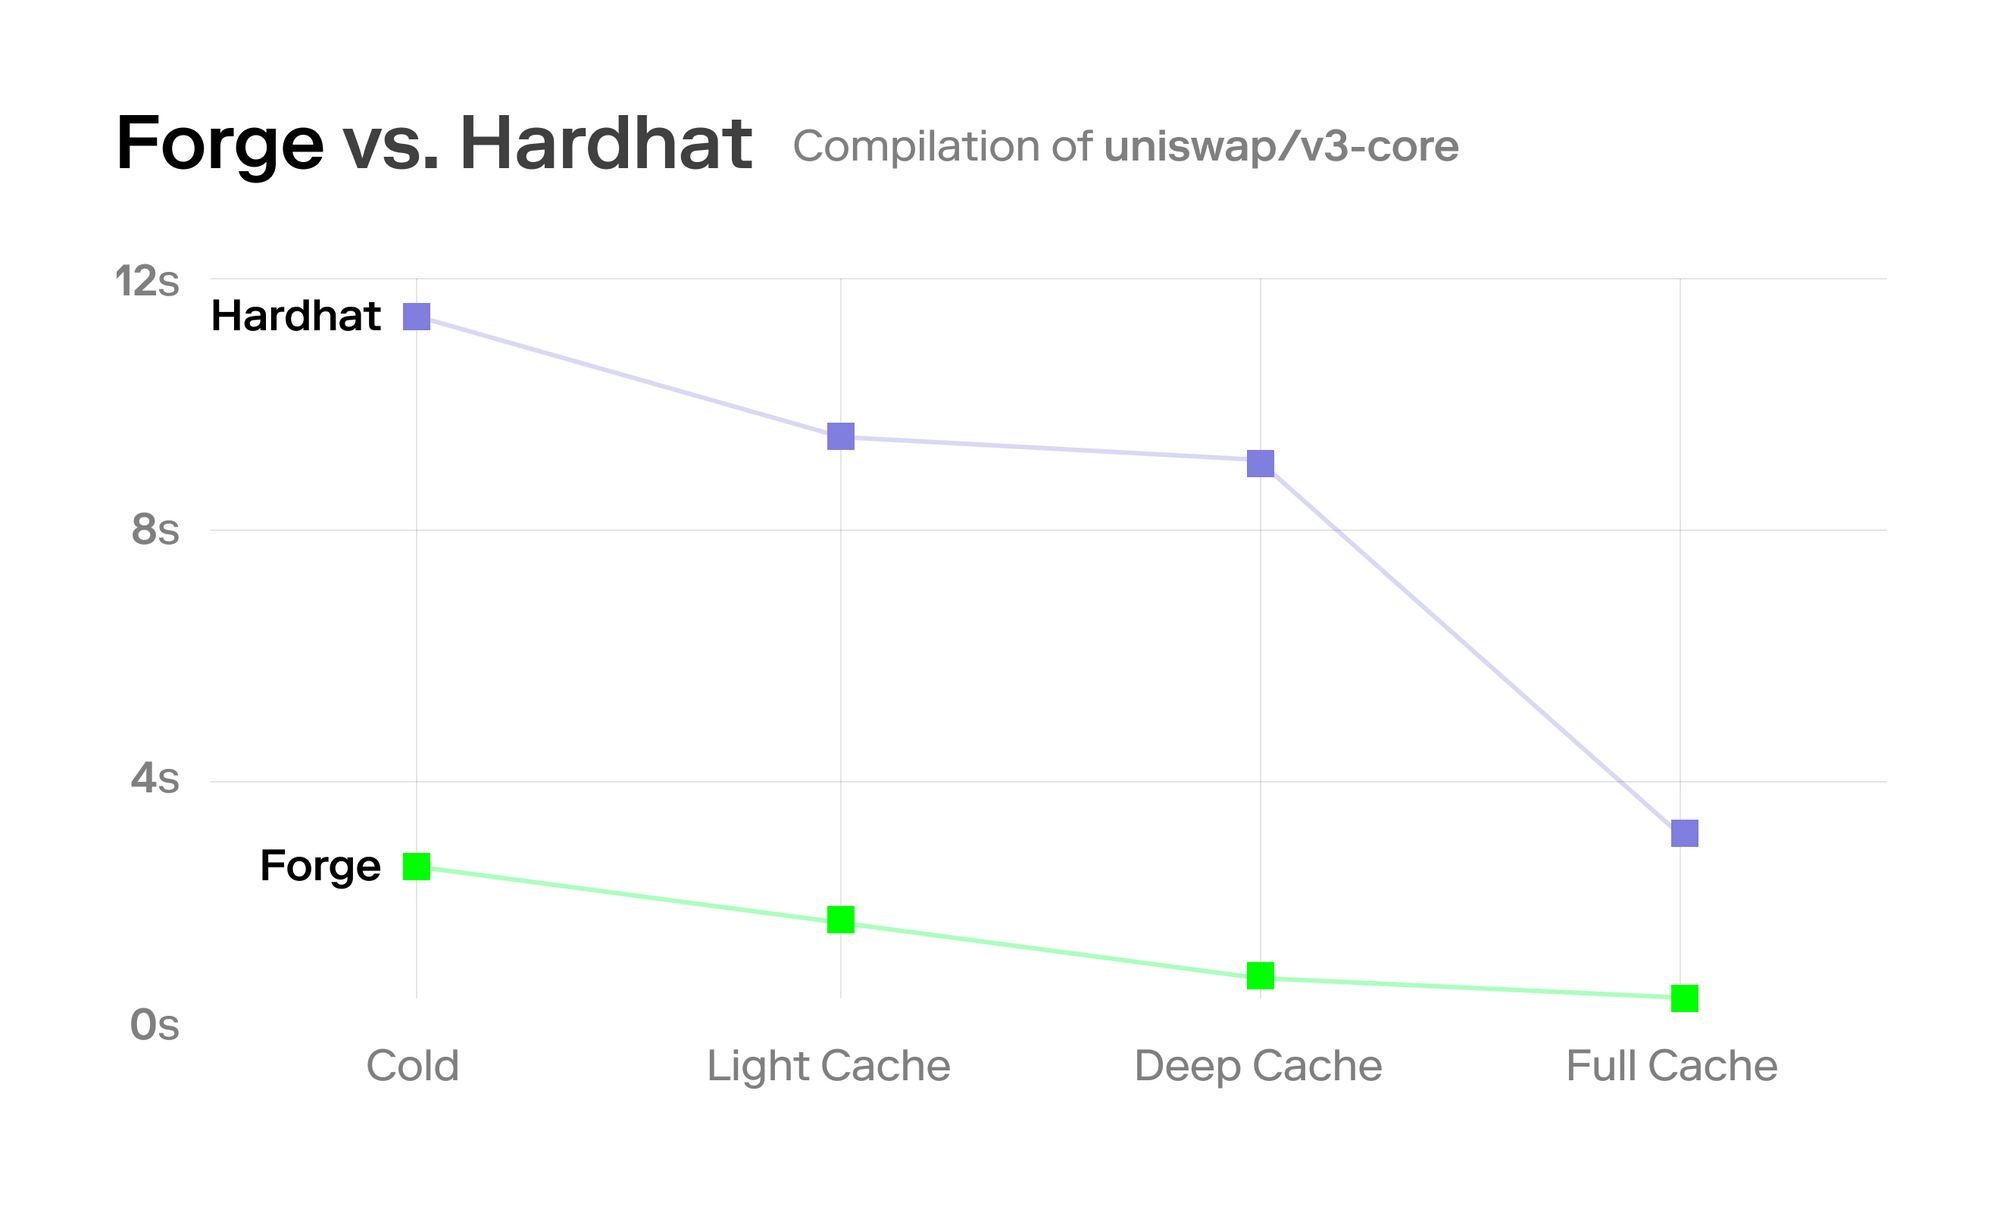
As you can see, it's much faster with Foundry.
Writing the unit tests is a subject of its own so we've made a full article to learn more about it. You can read it here:
How to deploy your smart contracts
Lastly, when you're done working on your smart contracts, you need to deploy them to the network of your choice. Foundry supports all the EVM networks.
Unfortunately, Foundry can only deploy one contract at a time so you will need to run the deploy command for each contract you want to deploy or create a Foundry script.
To deploy a smart contract, we use the forge create command and we need to pass the following options:
--rpc-urlthe URL of the blockchain provider that will send the requests to the blockchain for you. You can use your own node or use a blockchain API like Infura, Alchemy or QuickNode (I recommend Infura).--private-keythe private key of the account that will send the deploy transaction and pay for the gas fees. You can use MetaMask to create a wallet and export a private key.--constructor-argsthe arguments to pass to the constructor of the smart contract. Pass the exact value you want in the same order as the constructor expects them.--etherscan-api-keyyour Etherscan API key, it will be used to verify your smart contract on Etherscan--verifyif you pass this flag, it will try to verify your smart contract on Etherscan. You'll need to pass an API key using the flag above, otherwise it will fail.- The path to the source code of the contract you want to deploy
Here is an example:
$ forge create --rpc-url YOUR_URL_HERE \
    --constructor-args "param1" param2 \
    --private-key YOUR_PRIVATE_KEY src/MyContract.sol \
    --etherscan-api-key YOUR_ETHERSCAN_API_KEY \
    --verify
If the file contains multiple contracts, you can pass the name of the contract you want to deploy like this:
forge create --rpc-url YOUR-URL --private-key YOUR-PK src/MyContract:ContractNameMore information about the deploy command here.
How to write scripts in your project
Foundry also allows you to write scripts to automate tasks like deploying your contracts or calling functions.
Like unit tests, it's a subject of its own so we've made a complete article about this topic. You can read more about it here:
And that's it 🎉
Thank you for reading this article

