
How to code and deploy a smart contract on the Polygon network
In this tutorial, we are going to learn how to create a smart contract and deploy it to the Polygon network using Foundry, Hardhat or Brownie.
In this tutorial, we are going to learn how to create a smart contract and deploy it to the Polygon network using Foundry, Hardhat or Brownie.
Polygon has been growing in popularity this past few months/years, because of it's low fees and its security since it's built on top of Ethereum. It has grown significantly and is now the blockchain chosen by brands like Instagram, Adidas, Prada or Stripe.
How to create a smart contract on Polygon
You can create a smart contract for the Polygon network using Solidity or any other language that you would use for creating a smart contract on Ethereum like Vyper.
Polygon is an EVM blockchain, which means it's build on top of Ethereum, it's a layer-2 network of the Ethereum blockchain.
That means, creating a smart contract for Ethereum and for Polygon is the same. The only difference is the network in which you deploy the contract.
That also means you can use the same tools that you use for developing on Ethereum. You can use Hardhat, Foundry or Brownie to get a development environment in which you can create your contracts, write the unit tests and write the scripts like the one to deploy your contracts.
How to deploy a smart contract to the Polygon network
First, no matter what environment you're using, you need to get a provider API URL. That API URL, is a URL that you can use to interact with the Polygon network through a node.
You can get API URLs from providers like Infura, Alchemy or QuickNode. It's free, but you have to create an account.
Once you have your URL, the next steps depend on your environment.
How to deploy to Polygon using Hardhat
To deploy a smart contract to Polygon using Hardhat, you need to create a new script which will send the deploy transaction to the blockchain for the contract you want.
Here is what a basic deploy script looks like:
const { ethers } = require("hardhat");

async function main() {
  const MyContract = await ethers.getContractFactory("MyContract");
  const myContract = await MyContract.deploy();

  await myContract.deployed();

  console.log(`MyNFT deployed to ${myContract.address}`);
}

main().catch((error) => {
  console.error(error);
  process.exitCode = 1;
});
Then, in your Hardhat config file, you need to put your provider API URL and the private key of the wallet that will send the deploy transaction and pay for the network fees. It needs to have some MATIC tokens on the Polygon network to pay for the gas fees which are low.
Here is what it looks like:
require('@nomicfoundation/hardhat-toolbox');

/** @type import('hardhat/config').HardhatUserConfig */
module.exports = {
  solidity: '0.8.9',
  networks: {
    polygon: {
      url: 'BLOCKCHAIN_API_URL',
      accounts: ['YOUR_PRIVATE_KEY'], // never share this
    },
  },
  etherscan: {
    apiKey: {
        polygon: 'POLYGONSCAN_API_KEY',
    },
  },
};
Lastly, you can run the deploy script using the following command:
npx hardhat run --network polygon scripts/deploy.jsAs you can see, there is also an Etherscan API key in the config. You can get one by creating an account. That API key can be used if you want to verify your contract code on Polygonscan (the Etherscan for the Polygon network).
To verify your code on Polyganscan, you can run:
npx hardhat verify --network polygon <contract-address>More information on how to deploy a contract using Hardhat here.
How to deploy to Polygon using Brownie
Like with Hardhat, you need to create a script in your Brownie project that will deploy your smart contract to Polygon.
Here is what a basic deploy script looks like:
from brownie import MyContract, network, accounts, config

def main():
    account = accounts.add(config["wallets"]["from_key"])
    print(f"Deploying contract to {network.show_active()}...")
    contract = MyContract.deploy({"from": account})
    print(f"Deployed at {contract} !")
    return contract
Then, you need 2 environment variables. One for the private key of the wallet that will send the deploy transaction and one for the provider API Key.
First, the private key goes in a PRIVATE_KEY environment variable:
export PRIVATE_KEY=YOUR_PRIVATE_KEY_HEREIn your Brownie config file brownie-config.yaml, you need to add your wallet:
dotenv: .env
wallets:
  from_key: ${PRIVATE_KEY}
If you use Infura (which I recommend and Brownie uses that by default) you can set the API key (and not the URL) in this environment variable:
export WEB3_INFURA_PROJECT_ID=YOUR_API_KEYOr, if you use Alchemy, you need to add this one:
export WEB3_ALCHEMY_PROJECT_ID=YOUR_PROJECT_IDThen, make sure that Polygon is in your network list and get the name of the network by running brownie networks list which prompts something like this:
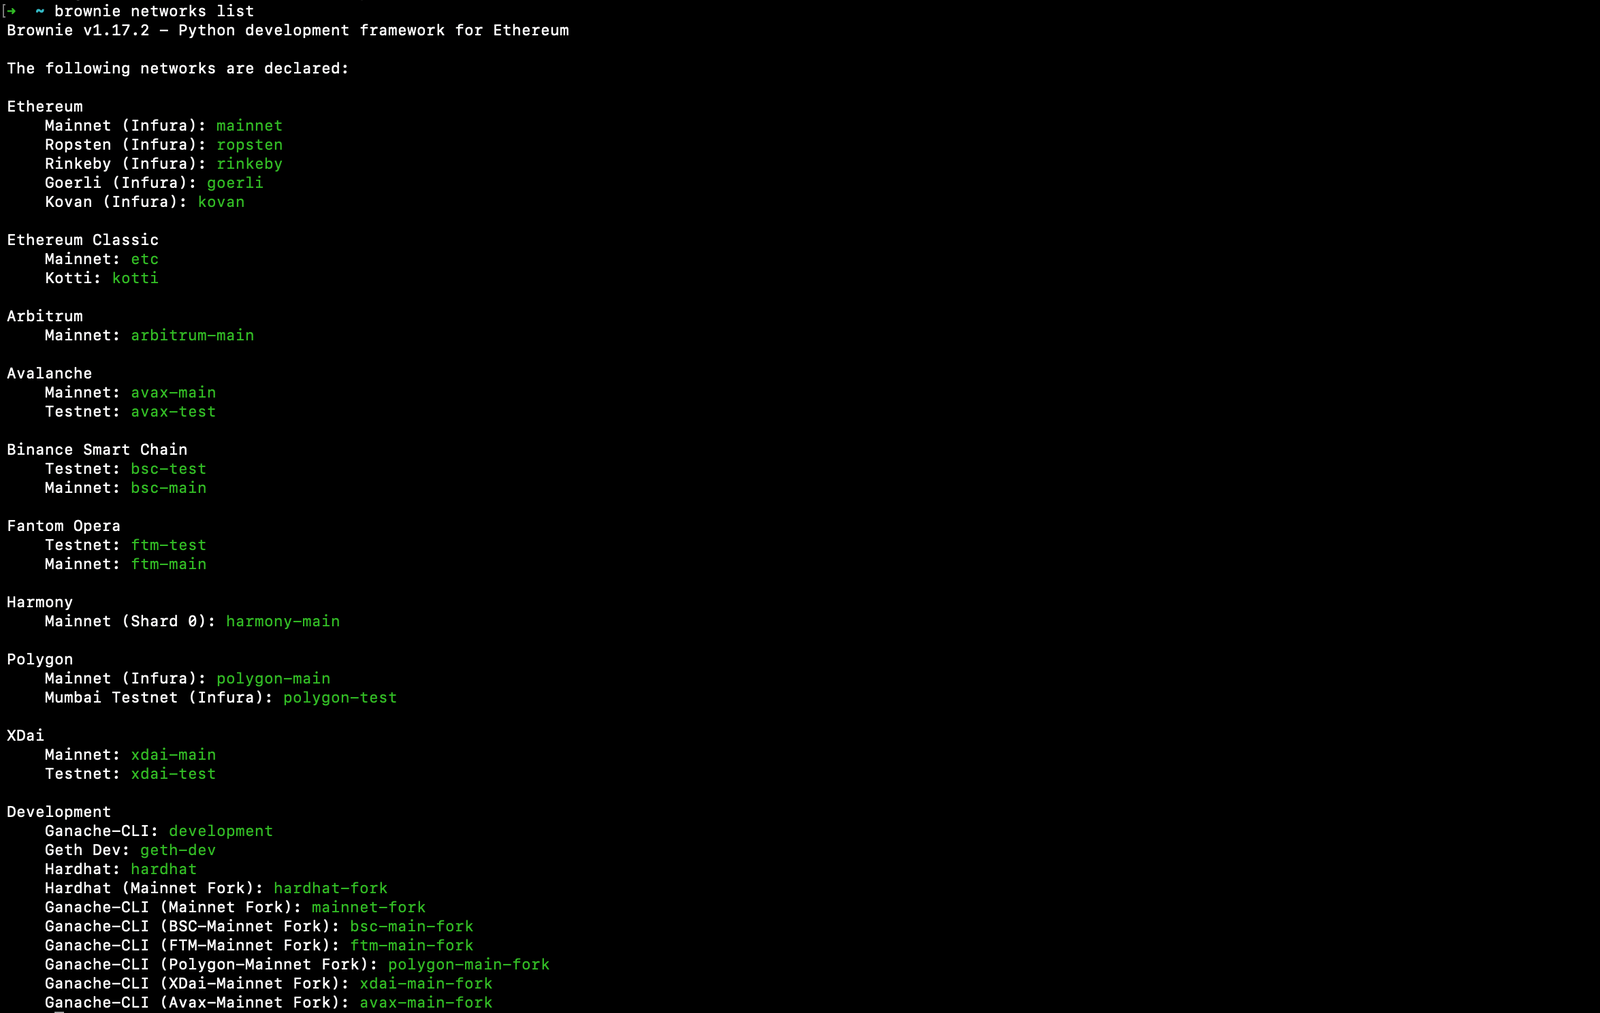
The Polygon network has the name polygon-main, so you can run the deploy script on the Polygon network using this command:
brownie run ./scripts/deploy.py --network polygon-mainMore information about the networks in Brownie here:
And learn more about how to deploy a smart contract using Brownie here.
How to deploy to Polygon using Foundry
To deploy a smart contract, we use the forge create like this:
forge create --rpc-url YOUR_API_URL_HERE \
    --constructor-args "param1" param2 \
    --private-key YOUR_PRIVATE_KEY src/MyContract.sol \
    --etherscan-api-key YOUR_POLYGONSCAN_API_KEY \
    --verify
As you can see, you need to pass your provider API URL, the parameters of your constructor (or don't pass the --constructor-args flag if there is no parameters), the private key of the wallet that will send the deploy transaction (which needs to have some MATIC tokens on Polygon) and your Polygonscan API Key if you want to verify the contract code on Polygonscan.
More information on how to deploy a smart contract using Foundry here:
And that's it 🎉
Thank you for reading this article

