
How to deploy a Solidity smart contract with Brownie
In this guide, we are going to learn how to deploy a Solidity smart contract on a Brownie project and verify the smart contract on Etherscan.
In this guide, we are going to learn how to deploy a Solidity smart contract on a Brownie project and verify the smart contract on Etherscan.
Brownie is a development environment for Ethereum that allows you to create smart contracts in Solidity, compile them, test them with Python and run Python scripts that interact with your smart contracts and the EVM blockchain you want.
To deploy a smart contract with Brownie, you'll need to create a deploy script in Python.
Here is what a minimal deploy script:
from brownie import MyContract, network, accounts, config

def main():
    deploy()

def get_account():
    # if dev return accounts -1 else (testnet or mainnet) return account in env
    if network.show_active() == "development":
        return accounts[-1]
    return accounts.add(config["wallets"]["from_key"])

def deploy():
    account = get_account()
    print(f"Deploying contract to {network.show_active()}...")
    contract = MyContract.deploy({"from": account})
    print(f"Deployed at {contract} !")
    return contract
Let's have a look at this code in details
1. Configuring accounts
In the code above, the get_account function will return the account that we will send the transactions from.
This account will be the development accounts that were generated for us when we run the script on a development environment (meaning a local node on your computer using a tool like Ganache).
Otherwise, if you're running on a testnet like Goërli or on the Ethereum mainnet, the account used will be the account you put in your brownie-config.yaml config file.
To put a real account that can connect to testnets and mainnets, you need to have a private key and put it in a .env file and reference that file in brownie-config.yaml. The easiest way to do that is to create a MetaMask wallet and export your private key by clicking on the 3 dots at the top right corner and then on "Account details".
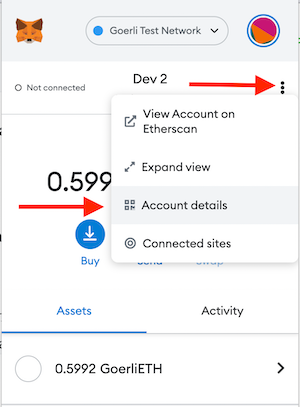
In your account details, click on "export private key". Be careful to never show that private key to anyone otherwise someone might be able to send transactions on your behalf.
Then, in your .env file, put your private key in a variable like this:
export PRIVATE_KEY=YOUR_PRIVATE_KEY_HEREAnd then add that line in brownie-config.yaml:
dotenv: .env
wallets:
  from_key: ${PRIVATE_KEY}
2. Deploying the smart contract
In the deploy script (and in any script), brownie will call the main function that you define. In our case, the main function calls deploy.
The deploy function uses the get_account function to send a deploy transaction from the right account.
To deploy a smart contract, you have to import it from brownie (it has the same name that you defined in your contract) and then call the deploy function:
contract = MyContract.deploy({"from": account})Replace MyContract with the name of your contract.
Then, if you print contract you'll get the address of your smart contract. It is very important to save it otherwise you have no way of knowing the address of your newly created smart contract and so you can't interact with it.
3. Running the script on a testnet or mainnet
To add a new network, you'll need a blockchain API provider that allows you to connect to that network. Blockchain APIs provide blockchain nodes that you can send HTTP requests to that will in turn be sent to the blockchain.
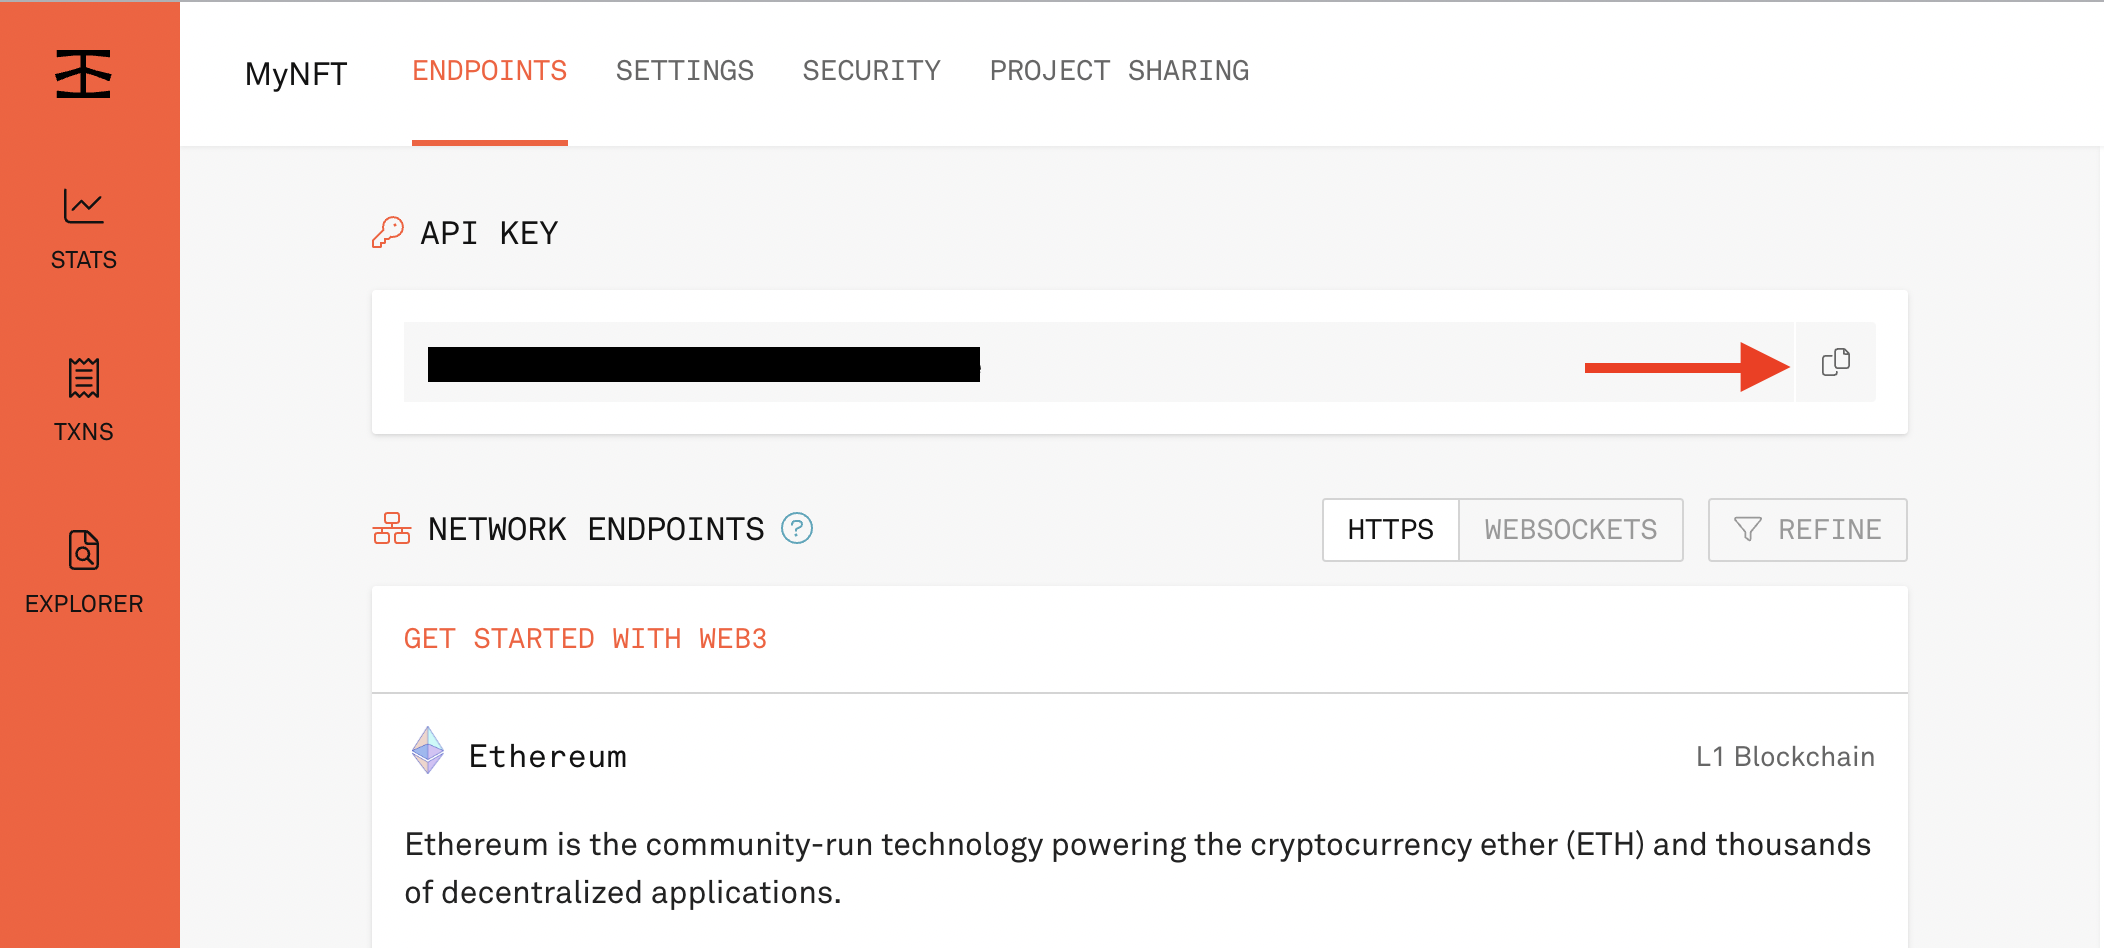
The most popular one for Ethereum and its testnets is Infura. It's completely free, all you have to do is create an account, go to your dashboard, create a new API key, then, back on the dashboard, click on "Manage Key" and copy the API Key:
Once you have a API Key from Infura, add variable to your .env:
export WEB3_INFURA_PROJECT_ID=YOUR_API_KEY(and replace YOUR_API_KEY with your API Key)
Note that if you want to use another provider like Alchemy, you can replace INFURA in the name of the variable with ALCHEMY.
If you run the command brownie networks list, you'll see the networks that you can run your scripts on (assuming you configured the environment variables correctly):
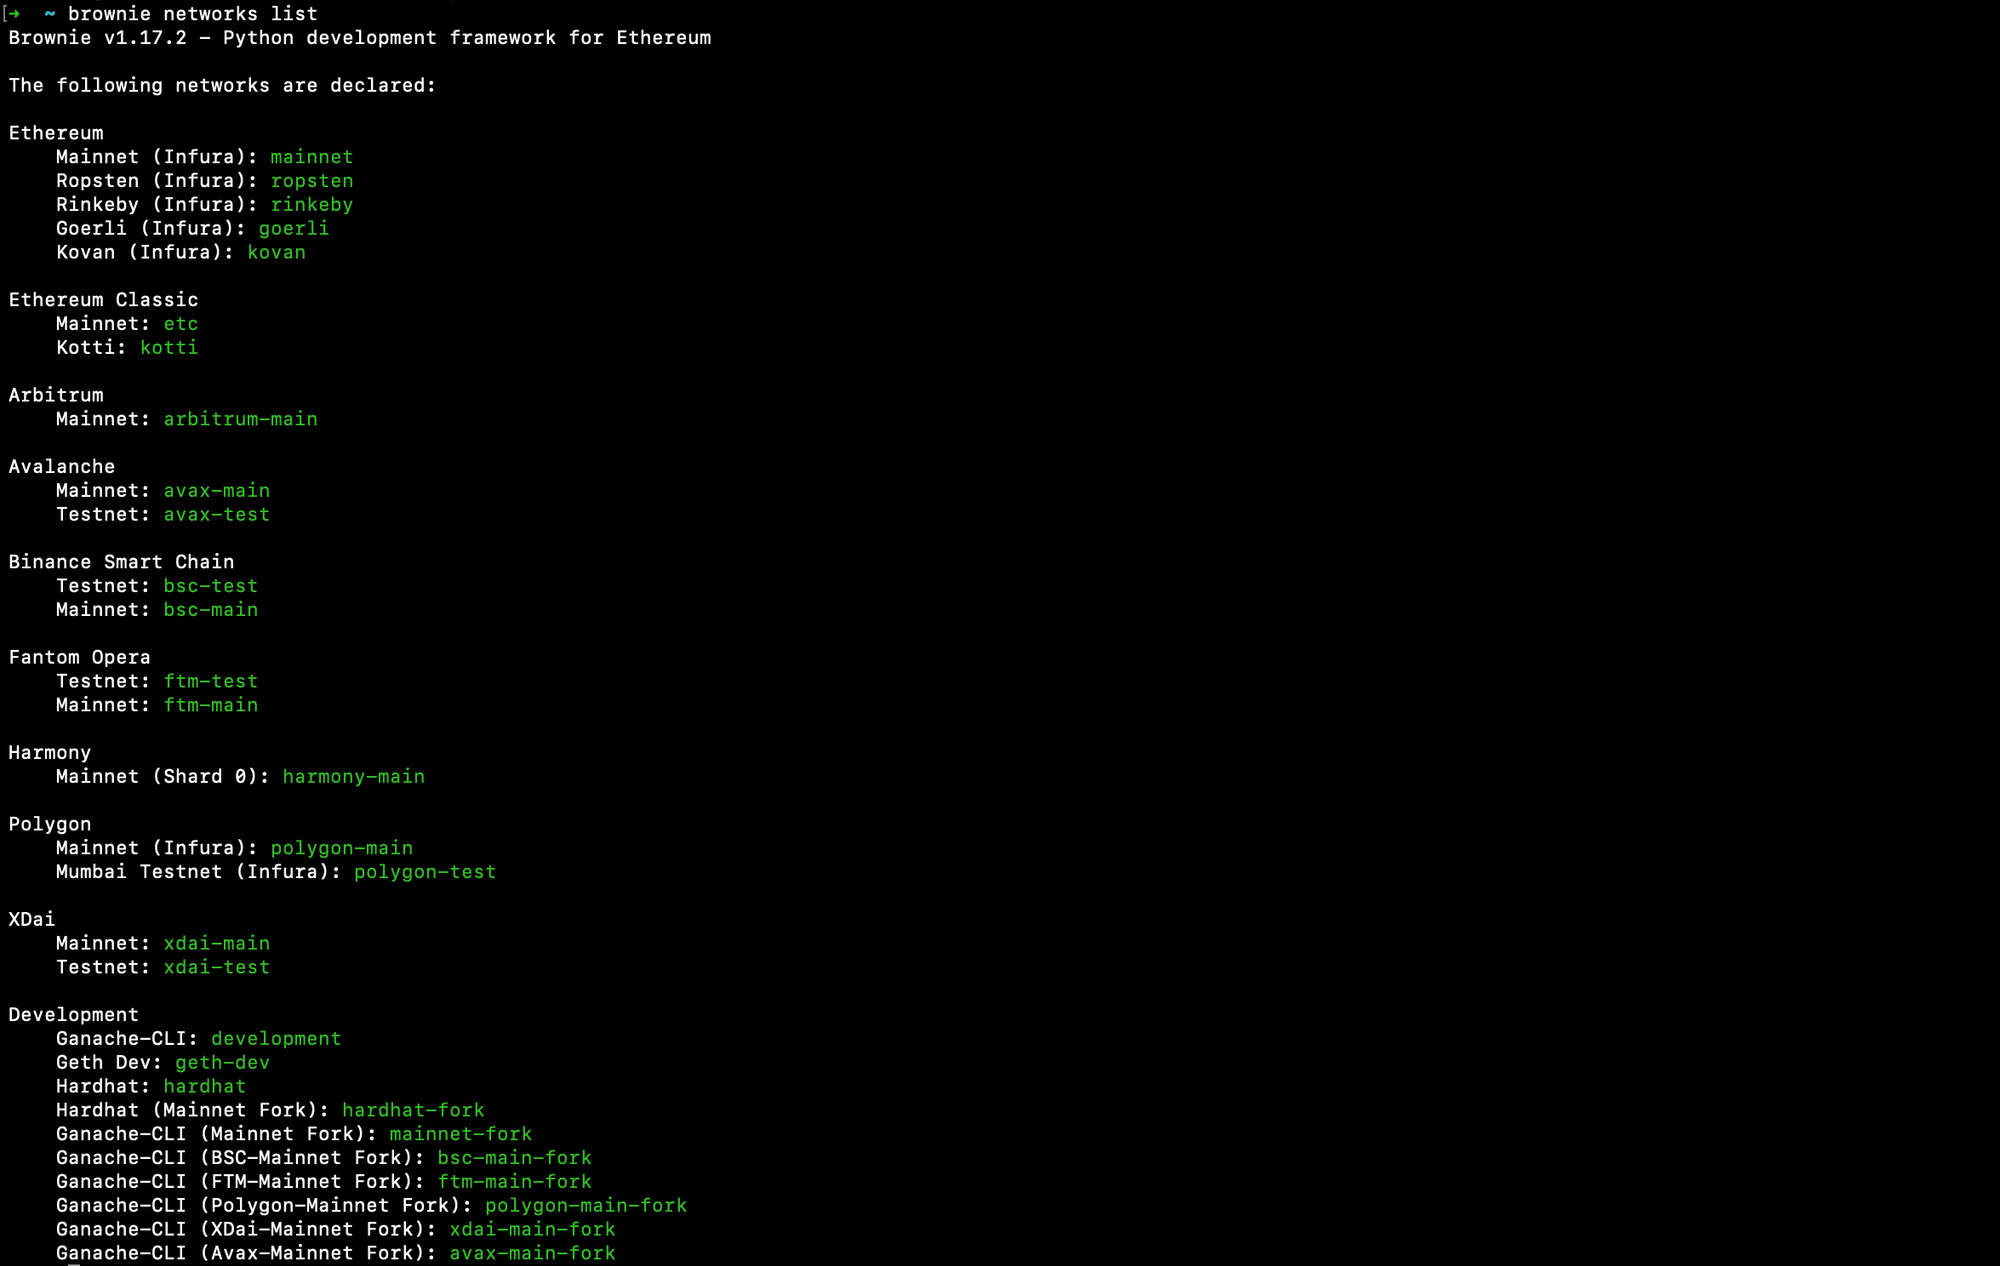
Looking at that, you can see that the Ethereum mainnet is called mainnet in brownie and that the Goërli testnet is called goerli.
So, if you want to run your script on the mainnet to deploy your smart contract on Ethereum mainnet, you can use this command:
brownie run ./scripts/deploy.py --network mainnetAnd if you want to run your script on Goërli to deploy your smart contract on Goërli, you can use this command:
brownie run ./scripts/deploy.py --network goerliUsing brownie and that same command, you can also deploy to the Binance Smart Chain, Avalanche, Polygon, Fantom, Arbitrum and other networks.
4. How to verify your smart contract on Etherscan
To verify your smart contract on Etherscan using Brownie, you need to create an account on Etherscan here: https://etherscan.io/register
Once you created your account, go to your profile in the "API Keys" section. Next, create a new API Key and copy it.
In your .env file, add your Etherscan API key:
export ETHERSCAN_TOKEN=YOUR_API_KEYIf you want to use another network than Ethereum and its testnets, you can repeat that same process on the blockchain explorer of the network you're using and replace ETHERSCAN in the name of the variable with the name of the blockchain explorer.
Now, in your deploy script, you have to pass the publish_source parameter to the deploy function and set it to true:
contract = MyContract.deploy({"from": account}, publish_source=True)However, you don't want to do that if you're on a local network so in the deploy function, you can add this:
should_publish_source = network.show_active() != "development"
contract = MyContract.deploy(
    {"from": account},
    publish_source=should_publish_source
)
That way, if the network the script is running on is the development network (ie. your local computer) then it's not going to try to verify the contract on Etherscan. Otherwise, it will try to verify your smart contract.
To check if your smart contract was verified correctly, search for its address in the search bar. Then, if you go on the "Contract" tab and you can see the code and your functions in the "Read contract" and "Write contract" sections, it means that the contract was correctly verified!
And that's it 🎉
Thank you for reading this article, if you want to go further and get better at blockchain development, leave your email below and you'll get:
- access to the private Discord of a community of Web3 builders
- access to free guides that will teach you a subject from scratch like the Web3 JS Cheat Sheet

