How to create a Solana token with the Solana Program Library CLI
In this guide, we are going to learn how to create your own token on the Solana blockchain using the Solana Program Library (SPL) and the CLI.
In this guide, we are going to learn how to create your own token on the Solana blockchain using the Solana Program Library (SPL) and the CLI.
To create a Solana token, you don't need to code your own smart contract (called custom programs in Solana) like you would do when creating a token on Ethereum.
To create a token, or a non-fungible token (NFT), you can use the Solana Program Library which defines the implementations for you.
To create a token using SPL, you can either use the CLI or the JavaScript library they provide. I'm going to cover the CLI method here.
How to install the Solana Program Library CLI
To install the SPL CLI tool, you'll need to install Solana on the CLI, Cargo and the Rust programming language. For that, use these commands:
To install Rust and cargo check out the docs here. On Mac or Linux, run this (it will install both):
curl https://sh.rustup.rs -sSf | shTo install Solana (this works on mac and linux, link to the docs to see more details for windows):
sh -c "$(curl -sSfL https://release.solana.com/v1.14.3/install)"The version might have changed at the time you're reading this so check the official docs to get the latest command.
Otherwise if you have brew install on Mac, you can run brew install solana
After all that, you will need to close and re-open your terminal.
Now, to install the SPL CLI, run this:
cargo install spl-token-cliCreating a token on Solana from the CLI using the Solana Program Library (SPL)
Environment
You can switch from the dev environment (meaning your commands will be run on Solana Devnet) to the mainnet (the real Solana network) using the following commands.
This wallet is going to be the owner of the token's smart contract.
To switch to the devnet, run:
solana config set --url https://api.devnet.solana.comTo switch to the mainnet, run:
solana config set --url https://api.mainnet-beta.solana.comTo check the current config, run:
solana config getIf the "RPC URL" contains "mainnet", you're on the mainnet. If it contains "devnet", you're on the devnet.
Creating the wallet
First, we need a wallet to send the transactions from. This wallet should have some SOL to pay for gas fees (1 SOL will be more than enough).
To create a new wallet in the CLI, run this command:
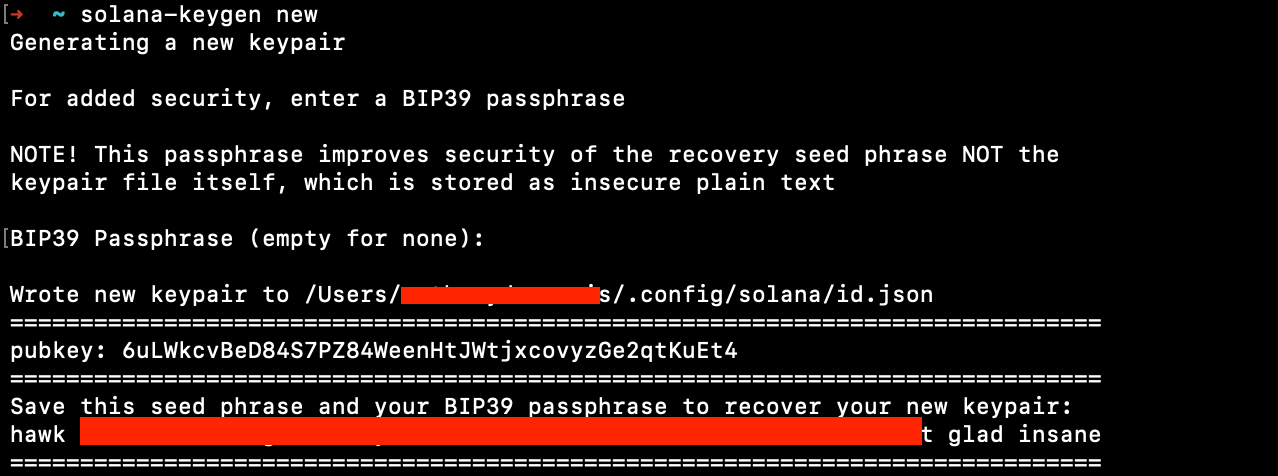
solana-keygen newThe wallet's public key (address) and the seed phrase will be displayed in the terminal after running this command.
It's very important you store that seed phrase in a secure place so you can recover your wallet in a wallet like Phantom or regenerate the private key from it. Never share that to anyone otherwise they can send transactions with your wallet.
The path to the file where the wallet information is stored will also be displayed in the terminal. Save the path to that file somewhere safe as well so you can find it whenever you need.

Fund your new wallet
Next, you need to add Solana tokens to your wallet to pay for gas fees. If you're on the mainnet, you'll have to buy SOL from an exchange and transfer it to the address you just generated (pubkey).
If you're on the devnet, you can airdrop SOL to your wallet using the following command:
solana airdrop 1Creating your token
The simplest way to create a token using the SPL CLI is to run this on your terminal:
spl-token create-token
This will create a very basic token that you can configure (change the supply, name, mint...)
Running that command will give you the address of your newly created token. That address is extremely important. That address is used to interact with the token.
Creating an account in your wallet for your token
Now, you need an account to store the tokens. An account is a place in your Solana wallet (the one you generated previously or another one) where you can store custom tokens.
To create the account (replace <token-address> with your token address that you just generated):
spl-token create-account <token-address>That command will then display the pubkey of your account for that token.

Checking the token balances of your wallet
To check how much tokens you have you can run (replace <token-address> with the token you want to check the balance for):
spl-token balance <token-address>This returns 0 when you run it with the token address you created because we didn't mint any tokens yet.
To see the Solana balance of an address (it can be the address of a wallet, a program or an account), run:
solana balance <address>Minting tokens
Minting tokens is the act of actually generating the tokens. Just like governments print money to generate new dollars, you need to mint tokens to put them in circulation.
Here is the command to mint new tokens:
spl-token mint <token-address> <amount-to-mint> <account>Using that command, you mint the amount of tokens you pass and the account that you pass will receive these new tokens.
Now, you can do whatever you want with these tokens, you can transfer them, add them to a pool so people can purchase them, burn them and many more things!

Transferring the tokens to another wallet
You might not want to keep all the tokens in your own wallet so to transfer the tokens you can run:
spl-token transfer --fund-recipient <tokena-address> <amount> <recipient-address>Running that command will transfer the amount of tokens you choose to the wallet you want.

As you can see above, if the recipient wallet is not funded, you will have to pass an extra flag: --allow-unfunded-recipient.
Limiting the supply and disabling mint
As you may know, most tokens can't be minted indefinitely. Setting a total supply available creates rarity and a real value on the token.
By default, you can't set the limit supply of a token but you can disable the mint.
To disable the mint:
spl-token authorize <token-identifier> mint --disableThis will disable the so it's now impossible to mint, unless you re-enable it.
Burning tokens
Burning tokens means "deleting" tokens completely from the supply. This is used to increase the rarity of a token which will increase its value.
To burn tokens, you need to run this command and pass in the address of your token account and the amount of tokens you want to burn:
spl-token burn <token-account-addresss> <amount>Naming your token and registering your token
Right now, your token is created and you can see it in the Solana blockchain explorer.
But it's not registered in Solana's token list! So it doesn't have a name or a logo.
To do that, in the past, you needed to create a pull request on Solana's token list Github repository. Now, this repository is archived but gives you 2 websites to register your token. You can find the repository with instructions here.
All you have to do now is register the token in one of these 2 websites (at the time of writing this):
When you read this, it might have changed and maybe there are new ways to do that.
I recommend using the second website at the moment.
First, you need to have a Phantom wallet (or another Solana browser wallet) where you're going to transfer some of your tokens and some SOL. If you are on the devnet want to airdrop your wallet from the browser, you can go to this website. Otherwise you can use this command in your terminal:
solana airdrop 1 <address-to-airdrop>Then, you need to create a JSON file that will contain your token metadata. Your metadata file should look like this:
{
  "name": "TOKEN NAME",
  "symbol": "TOKEN SYMBOL (A FEW LETTERS)",
  "description": "DESCRIPTION OF THE TOKEN",
  "image": "URI OF THE LOGO IMAGE"
}
To generate the JSON file, open a text editor like VS Code and create a new JSON file. Then add the metadata you want inside and save it.
Next, go to the second website and go to the "Upload Metadata" section. From there, choose the network you want and connect your wallet. Then upload a logo for your token (it costs 1 SOL) and copy the URL they give you.
Otherwise, you can also deploy it yourself somewhere and paste the URL there.
Put the logo image URL in the metadata in the image property. Save the JSON file and upload it on the website. It will give you a URL that you need to copy because you'll need that later.
Same here, it costs 1 SOL. If you don't want to pay, you can deploy it somewhere else and paste the URL there.
Lastly, go to the "Update metadata" section, fill in all the fields and paste your metadata URL in the "Metadata URL" input field.
Then you can submit the form and your token is created! Now in your Phantom wallet, you should see the logo and name of your token.
And that's it 🎉
Thank you for reading this article, if you want to get better at blockchain development, leave your email below and you'll get:
- access to the private Discord of a community of Web3 builders
- access to free guides that will teach you Blockchain Development


