
How to sign messages and verify signatures on Solana with React and JavaScript
In this tutorial, we are going to learn how to sign a message with the Solana wallet connected to your React app and how to verify that a signature was generated with the right wallet.
In this tutorial, we are going to learn how to sign a message with the Solana wallet connected to your React app and how to verify that a signature was generated with the right wallet.
Here is an example of how to do it:
import { WalletMultiButton } from '@solana/wallet-adapter-react-ui';
import { useWallet } from '@solana/wallet-adapter-react';
import nacl from 'tweetnacl';
import base58 from 'bs58';
import { useState } from 'react';

const messageToSign = 'TEST MESSAGE';

export function Home() {
  const { publicKey, signMessage } = useWallet();

  const [signature, setSignature] = useState();

  async function sign() {
    try {
      const message = new TextEncoder().encode(messageToSign);
      const uint8arraySignature = await signMessage(message);

      setSignature(base58.encode(uint8arraySignature));
    } catch (e) {
      console.log('could not sign message');
    }
  }

  async function verify() {
    const message = new TextEncoder().encode(messageToSign);
    const uint8arraySignature = base58.decode(signature);
    const walletIsSigner = nacl.sign.detached.verify(message, uint8arraySignature, publicKey.toBuffer());

    if (walletIsSigner) {
      alert('The data was indeed signed with the connected wallet');
    } else {
      alert('The data was not signed with the connected wallet');
    }
  }

  return (
    <div>
      <WalletMultiButton />
      <button disabled={!publicKey} onClick={sign}>
        Sign message
      </button>
      <button disabled={!signature} onClick={verify}>
        Verify signature
      </button>
    </div>
  );
}
Let's dive in and talk about this code more in details.
But first, check out this tutorial if you want to learn how to connect a Solana wallet to your React app.
Sign data using the connected wallet
In the example above, I connect a wallet to the app using the @solana/wallet-adapter-react library and display a connect button.
Then, when a wallet is connected, we can use the useWallet hook to get the signMessage function.
That function takes in parameter the message to sign as a Uint8Array so we need to use TextEncoder to convert the string message we want the user to sign into a Uint8Array:
const messageToSign = "the data to sign"
const message = new TextEncoder().encode(messageToSign)
The signMessage function is asynchronous because we need the user to accept signing the message on their wallet.
So it's important to wrap the call to that function in a try ... catch because if the user doesn't accept, it will throw an error.
If there is no wallet connected, it will also throw an error so before calling that function, we need to make sure that a wallet is connected to our app. For that, we can just use the useWallet and get the publicKey which is the address of the connected wallet.
If that property is empty, that means no wallet is connected to our app. If it's not empty, then we can safely call signMessage because a wallet is connected.
try {
  const messageToSign = "the data to sign"
  const message = new TextEncoder().encode(messageToSign)
  const signature = await signMessage(message)
} catch (e) {
  console.log(e)
  console.log("could not sign message")
}
When we call signMessage, it will display a pop-up in the user's wallet asking them if they want to accept signing your data or not. On the Phantom wallet, it will look like this:
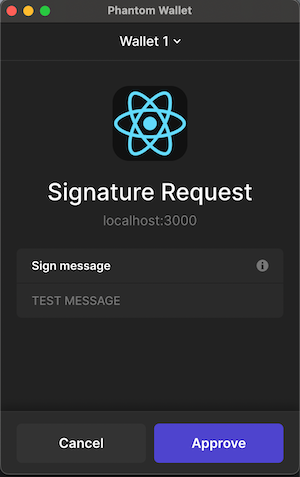
As you can see, Phantom displays the message that you asked to sign for transparency with the user. That's important for the user to trust the app.
If the user accepts signing the message, the signMessage function will return the signature that was generated. However, the returned value is a Uint8Array and not a string.
Converting the signature into a string
If we want to convert that value to a string, we need to use the bs58 library. That library allows us to encode and decode data using the base58 encoding which is what Solana uses for its signatures and transaction hashes (and other things).
To use that library, we can install it using Yarn or NPM:
npm install bs58

// OR

yarn add bs58
Then, we can turn a Uint8Array into a base58 encoded string using that library:
import base58 from 'bs58'

// ... rest of the app

try {
  const messageToSign = "the data to sign"
  const message = new TextEncoder().encode(messageToSign)
  const uint8arraySignature = await signMessage(message)

  const signature = base58.encode(uint8arraySignature)

} catch (e) {
  console.log(e)
  console.log("could not sign message")
}

// ... rest of the app
As a string, the signature will look like this:
4UxEq6zcJ9gCT9hqVZ9rCbcTCNKjGFMDzcroUfpVv45H9FmaWTmya4iUdooVDjptvfJ8HMkZjJe3dcAzjcWARhQ3Verifying that the signature was generated with the right public key
Now, in your app or in the back-end, you can verify that the signature was generated with the right address.
You can use the code I'm going to show you in both the front-end in the React app or in your back-end.
For that, we need to install a new library called TweetNaCl which is a light crypto library for JavaScript that supports secret-key authenticated encryption, public-key authenticated encryption, hashing, and public-key signatures.
To install that library, we can use Yarn or NPM:
npm install tweetnacl

// OR

yarn add tweetnacl
Then we can verify a signature using the verify function:
import nacl from 'tweetnacl'

// ... rest of the app

const walletIsSigner = nacl.sign.detached.verify(
  message,
  uint8arraySignature,
  publicKey
);
The verify function takes 3 parameters:
- The message that was signed (as a
Uint8Array) - The signature to verify (as a
Uint8Array) - The public key that you expect to have generated the signature (as a
Uint8Array)
If you have the signature as a string, you can convert it to a Uint8Array using the base58 library:
const uint8arraySignature = base58.decode(signature);And to convert the message that was signed into a Uint8Array, you can use TextEncoder:
const messageSigned = "the data to sign"
const message = new TextEncoder().encode(messageSigned)
The public key needs to be a Uint8Array so if you have it as a string, you can convert it to a Uint8Array using the base58 library:
const publicKey = base58.decode("GX6nkQgcXy4xDyuSH9MKjG9nq5KN5ntE3ZUUHSqUrcC8")Otherwise, if you're verifying the signature from the front-end, you can get the connected address as a Uint8Array using the useWallet hook and the toBuffer() method:
const { publicKey, signMessage } = useWallet()

const uint8ArrayPubKey = publicKey.toBuffer()
The verify function will return a boolean that will be true if the public key you passed in the parameters is the public key of the wallet that generated the signature you passed for the message you passed in the parameters:
import nacl from 'tweetnacl'

const messageSigned = "the data to sign"
const message = new TextEncoder().encode(messageSigned)

const signature = "4UxEq6zcJ9gCT9hqVZ9rCbcTCNKjGFMDzcroUfpVv45H9FmaWTmya4iUdooVDjptvfJ8HMkZjJe3dcAzjcWARhQ3"
const uint8arraySignature = base58.decode(signature);

const publicKey = base58.decode("GX6nkQgcXy4xDyuSH9MKjG9nq5KN5ntE3ZUUHSqUrcC8")

const walletIsSigner = nacl.sign.detached.verify(
  message,
  uint8arraySignature,
  publicKey
);
And that's it 🎉
Thank you for reading this article

