
How to transfer SPL tokens on the Solana blockchain in React
Learn how to transfer SPL tokens on the Solana blockchain from the wallet connected to your React app and the @solana/spl-token and @solana/wallet-adapter-react libraries.
In this tutorial, we are going to learn how to transfer SPL tokens on the Solana blockchain from the wallet connected to your React app and the @solana/spl-token and @solana/wallet-adapter-react libraries.
Here is an example in which I send 10 USDC on the Devnet from the connected wallet to another address:
import { useState } from 'react';
import { useWalletModal } from '@solana/wallet-adapter-react-ui';
import { useConnection, useWallet } from '@solana/wallet-adapter-react';
import { PublicKey, Transaction } from '@solana/web3.js';
import { TOKEN_PROGRAM_ID, createTransferInstruction, getOrCreateAssociatedTokenAccount } from '@solana/spl-token';

export function SendTokens() {
  const [txId, setTxId] = useState();

  // get a connection
  const { connection } = useConnection();

  // get the properties and methods we need to interact with the connected wallet
  const { publicKey: fromPublicKey, signTransaction, sendTransaction } = useWallet();

  const { setVisible } = useWalletModal();

  const sendTokens = async () => {

    // create a PublicKey instance from the recipient address
    const toPublicKey = new PublicKey('A8t59GvWSN6W3W4LKcqKNDhm9YYDEL8PSt235fyECA8J');

    // create a PublicKey instance from the token address
    const tokenPublicKey = new PublicKey('4zMMC9srt5Ri5X14GAgXhaHii3GnPAEERYPJgZJDncDU');

    // get or create a token account for the recipient address
    const toTokenAccount = await getOrCreateAssociatedTokenAccount(
      connection,
      fromPublicKey,
      tokenPublicKey,
      toPublicKey,
      signTransaction
    );

    // get or create a token account for the sender address
    const fromTokenAccount = await getOrCreateAssociatedTokenAccount(
      connection,
      fromPublicKey,
      tokenPublicKey,
      fromPublicKey,
      signTransaction
    );

    const transaction = new Transaction().add(
      createTransferInstruction(
        fromTokenAccount.address,
        toTokenAccount.address,
        fromPublicKey,
        parseInt(10 * Math.pow(10, 6)), // tokens have 6 decimals of precision
        [],
        TOKEN_PROGRAM_ID
      )
    );

    // set a recent block hash on the transaction to make it pass smoothly
    const latestBlockHash = await connection.getLatestBlockhash();
    transaction.recentBlockhash = latestBlockHash.blockhash;

    // set who is the fee payer for that transaction
    transaction.feePayer = fromPublicKey;

    // send the transaction
    const signature = await sendTransaction(transaction, connection);

    // set the transaction hash to the state
    setTxId(signature);

    // wait for the transaction to complete
    await connection.confirmTransaction({
      signature,
      lastValidBlockHeight: latestBlockHash.lastValidBlockHeight,
      blockhash: latestBlockHash.blockhash,
    });

    alert('The transaction is completed!');
  };

  return (
    <div>
      <button disabled={!fromPublicKey} onClick={sendTokens}>
        Send 10 USDC
      </button>
      {txId && <p>The transaction hash is {txId}</p>}
    </div>
  );
}
Let's dive into the code.
Installing the libraries and setting up the app
First, you need to set up your app so it allows users to connect their wallet.
To do that, check out this tutorial on how to connect a Solana wallet to your website.
Next, we need to install a library called @solana/spl-token. This is the library we use to interact with SPL tokens:
npm install @solana/spl-tokenYou can also install that library with Yarn.
To send tokens from an account to another, you either need to have a wallet connected to your website (see the tutorial above to learn how to allow users to do it) or have the private key of the account you are sending the tokens from.
We're going to focus on the first option here but at the end I'll also show you how to do it when you have the private key of the wallet.
Sending SPL tokens from the wallet connected to your app
Getting the connection to the blockchain
To start interacting with the blockchain, you need to have a connection to it. To get the connection, we use the useConnection hook which returns an object with a connection property inside of it.
import { useConnection } from '@solana/wallet-adapter-react';

// ... IN YOUR COMPONENT:

const { connection } = useConnection();
For testing on the Devnet or the Testnet, you will need to configure the ConnectionProvider a bit differently. Again, check out the tutorial above to see how to configure your app to be on the Testnet or the Devnet.
Getting tokens on the Devnet
Next, we need to fund our wallet with tokens for testing otherwise we don't have any tokens and we can't test.
To get free tokens on the Devnet, we can use a faucet. If you want USDC tokens, you can use this faucet: https://usdcfaucet.com/.
If you don't care about the tokens you get, use this one to get dummy tokens: https://spl-token-faucet.com/
Getting the token address
No matter which network you're on, you'll need to grab the address of the token you are using. In our case, we're using USDC tokens so the addresses will be:
EPjFWdd5AufqSSqeM2qN1xzybapC8G4wEGGkZwyTDt1von theMainnetCpMah17kQEL2wqyMKt3mZBdTnZbkbfx4nqmQMFDP5vwpon theTestnet4zMMC9srt5Ri5X14GAgXhaHii3GnPAEERYPJgZJDncDUon theDevnet
To find the address of other tokens, go to https://explorer.solana.com/ and search for your token. On the page of that token, you can copy the address:
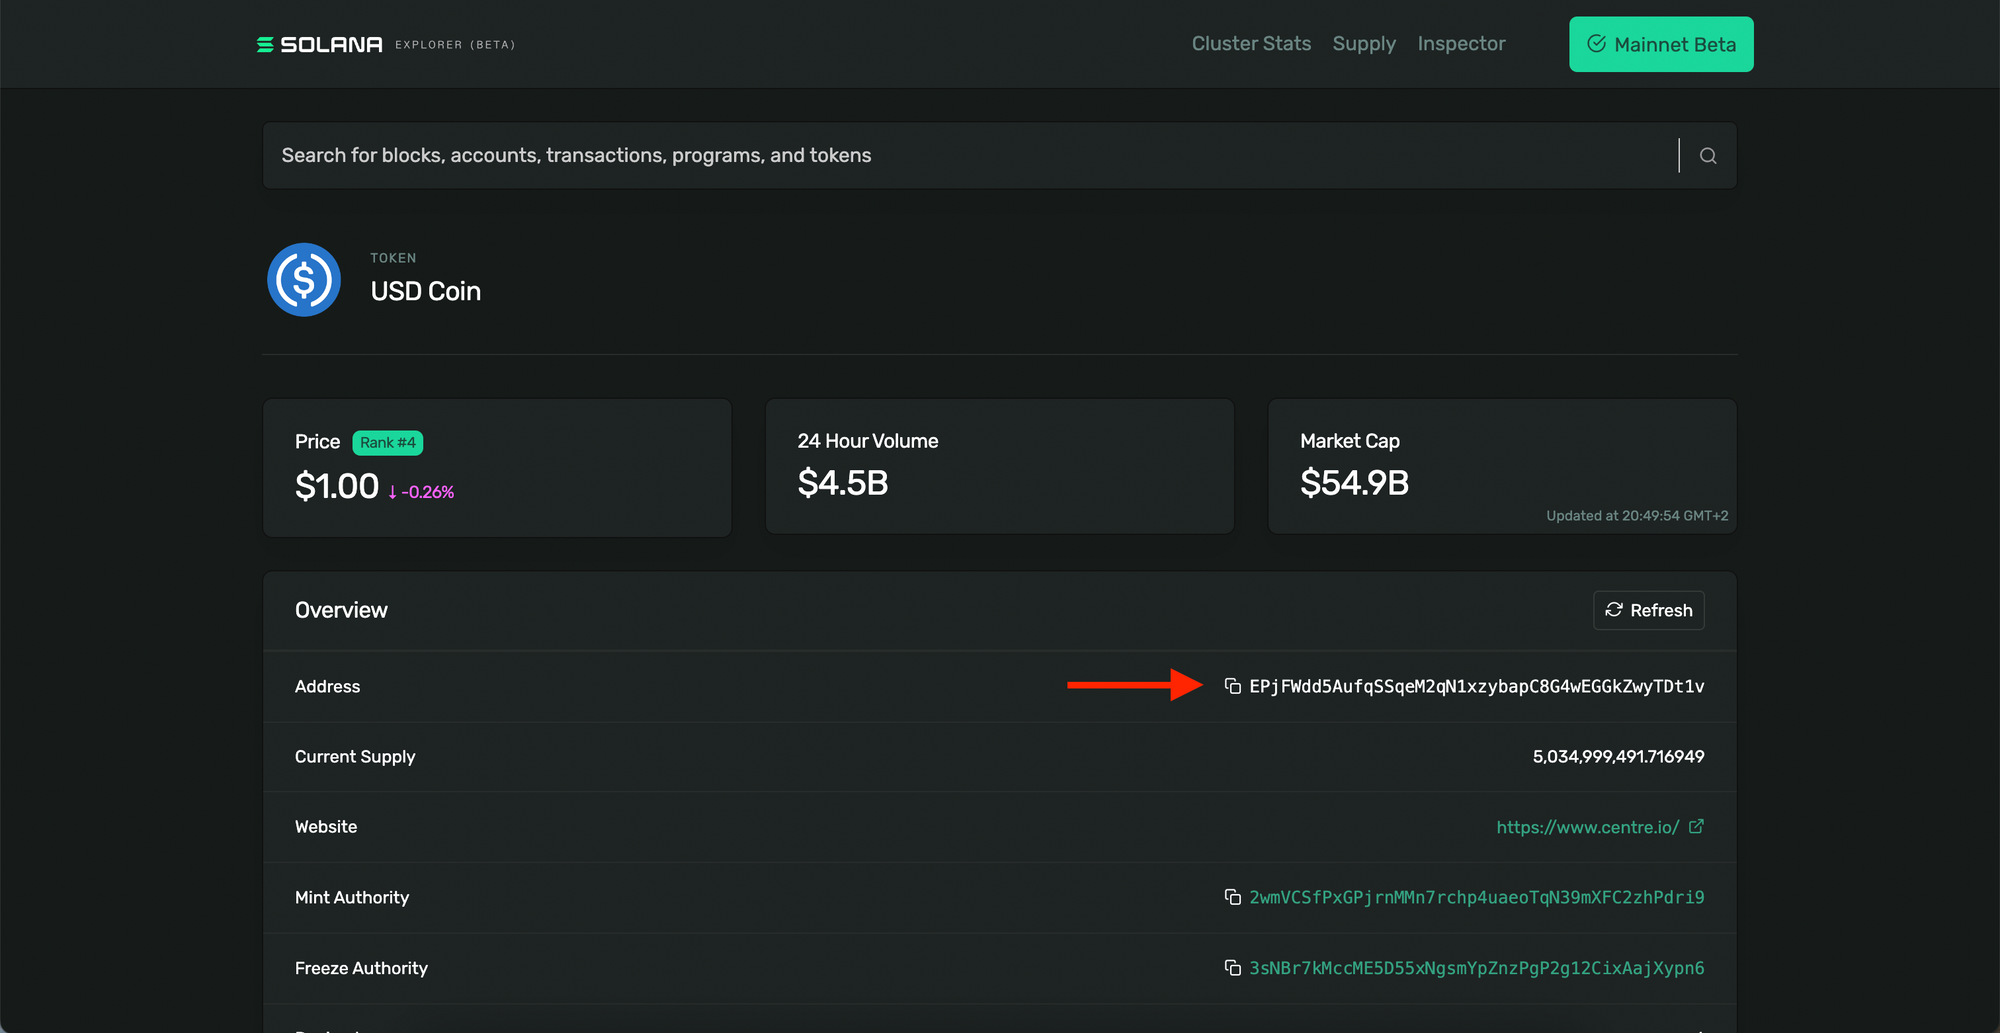
If you want to find the address on the Devnet or Testnet, switch the network of the explorer by clicking the button at the top right corner of the page.
In our example, we will use the Mainnet. So we have:
const tokenAddress = "EPjFWdd5AufqSSqeM2qN1xzybapC8G4wEGGkZwyTDt1v"Create PublicKey objects
Next, we need to create PublicKey objects from:
- the address we send the transaction from
- the address the transaction goes to
- the token address
Here is how to do it:
import { PublicKey } from '@solana/web3.js';


// ... IN YOUR COMPONENT

const fromAddress = "FROM_ADDRESS"
const toAddress = "TO_ADDRESS"

const fromPublicKey = new PublicKey(fromAddress);
const toPublicKey = new PublicKey(toAddress);

const tokenPublicKey = new PublicKey(tokenAddress);
Now, to get the PublicKey of the address we send the transaction from but instead of using the same code as above, we are going to keep things simple and just use the useWallet hook like this:
import { useWallet } from '@solana/wallet-adapter-react';


// IN YOUR COMPONENT:

const { publicKey: fromPublicKey } = useWallet();
Getting or creating the token accounts
To hold tokens and transfer them, an address needs to have an account specifically for that token.
When we want to transfer tokens, we need to get these token accounts or, if they don't exist (meaning they never interacted with the contract), we create them.
Here is how to do it:
import { getOrCreateAssociatedTokenAccount } from '@solana/spl-token';const toTokenAccount = await getOrCreateAssociatedTokenAccount(
connection,
fromPublicKey,
tokenPublicKey,
toPublicKey,
signTransaction
);
const fromTokenAccount = await getOrCreateAssociatedTokenAccount(
connection,
fromPublicKey,
tokenPublicKey,
fromPublicKey,
signTransaction
);In the parameters of the getOrCreateAssociatedTokenAccount function, we need to pass the connection, the fee payer (in case it needs to create an account), the token public key, the owner of the account, and the signTransaction function in case it needs to create an account.
To get the signTransaction function, we use the useWallet hook:
import { useWallet } from '@solana/wallet-adapter-react';


// IN YOUR COMPONENT:

const { publicKey: fromPublicKey, signTransaction } = useWallet();
That function isn't perfect and sometimes, I've had issues with it when the token account doesn't exist. The solution I found and that many other developers use is just to re-create the logic of that function yourself.
So if the getOrCreateAssociatedTokenAccount function throws a TokenAccountNotFound error instead of creating an account, use this code and instead of calling the getOrCreateAssociatedTokenAccount function from the library, use this one:
// getOrCreateAssociatedTokenAccount.js
import {
  TOKEN_PROGRAM_ID,
  ASSOCIATED_TOKEN_PROGRAM_ID,
  getAssociatedTokenAddress,
  getAccount,
  createAssociatedTokenAccountInstruction,
} from '@solana/spl-token';
import { Transaction } from '@solana/web3.js';

export async function getOrCreateAssociatedTokenAccount(
  connection,
  payer,
  mint,
  owner,
  signTransaction,
  allowOwnerOffCurve = false,
  commitment = "finalized",
  programId = TOKEN_PROGRAM_ID,
  associatedTokenProgramId = ASSOCIATED_TOKEN_PROGRAM_ID
) {
  const associatedToken = await getAssociatedTokenAddress(
    mint,
    owner,
    allowOwnerOffCurve,
    programId,
    associatedTokenProgramId
  );

  try {
    const account = await getAccount(connection, associatedToken, commitment, programId);
    return account;
  } catch (error) {
    try {
      const transaction = new Transaction().add(
        createAssociatedTokenAccountInstruction(
          payer,
          associatedToken,
          owner,
          mint,
          programId,
          associatedTokenProgramId
        )
      );

      const blockHash = await connection.getRecentBlockhash();
      transaction.feePayer = await payer;
      transaction.recentBlockhash = await blockHash.blockhash;
      const signed = await signTransaction(transaction);

      const signature = await connection.sendRawTransaction(signed.serialize());

      await connection.confirmTransaction(signature);
    } catch (error) {
      // Ignore all errors
    }

    // Now this should always succeed
    const account = await getAccount(connection, associatedToken, commitment, programId);
    return account;
  }
}
This code will just reproduce the logic of the getOrCreateAssociatedTokenAccount function. We try to get the token account of the address passed in the parameters and we create it if it doesn't exist.
Sending the transaction and waiting for it to complete
To send the transaction, we are going to use the sendTransaction function that is in the object that the useWallet hook returns:
import { useWallet } from '@solana/wallet-adapter-react';

// ......

const { publicKey: fromPublicKey, signTransaction, sendTransaction } = useWallet();
Now that we have that, we can create a Transaction object using all the variables we created up to this point and then send it:
import { PublicKey, Transaction } from '@solana/web3.js';
import { TOKEN_PROGRAM_ID, createTransferInstruction } from '@solana/spl-token';


// ..........

const transaction = new Transaction().add(
  createTransferInstruction(
    fromTokenAccount.address,
    toTokenAccount.address,
    fromPublicKey,
    parseInt(10 * Math.pow(10, 6)), // tokens have 6 decimals of precision so your amount needs to have the same
    [],
    TOKEN_PROGRAM_ID
  )
);

// set a recent block hash on the transaction to make it pass smoothly
const latestBlockHash = await connection.getLatestBlockhash();
transaction.recentBlockhash = latestBlockHash.blockhash;

// set who is the fee payer for that transaction
transaction.feePayer = fromPublicKey;

const signature = await sendTransaction(transaction, connection);

// and then send the transaction:
setTxId(signature);

// wait for a confirmation to make sure it went to the blockchain (optional)
await connection.confirmTransaction({
  signature,
  lastValidBlockHeight: latestBlockHash.lastValidBlockHeight,
  blockhash: latestBlockHash.blockhash,
});

alert('The transaction is completed!');
In the example above, first we create a Transaction object and we add TransferInstructions using the createTransferInstruction function.
In the parameters of that function, we pass:
- The address of the token account that sends the transaction
- The address of the token account that receives the transaction
- The fee payer (the sender of the function)
- The amount of tokens to send (it needs to be multiplied by 10^6 because the token amounts have 6 decimals of precision)
- If you're using multisig, pass an array containing all the signers
- The token program
Next, we need to add the latest blockhash in the recentBlockhash property of the transaction and set the feePayer to be the sender of the transaction.
After that, send our transaction using the sendTransaction function which takes in parameter the transaction to send and the connection to the blockchain.
It returns a Promise that returns the transaction signature when it resolves.
Lastly, you can wait for the transaction to be confirmed on the blockchain and wait for it to complete using confirmTransaction function of the connection object.
Sending SPL Tokens with the private key of a Solana account
If you have the private key of the account you send the transaction from, we are going to send the transaction differently.
In this case, the only difference is that you don't pass the signTransaction function to the getOrCreateAssociatedTokenAccount function.
Next, you need to install this library (to encode the private key and pass it in the required format):
npm install bs58And then use that code:
import { Keypair } from '@solana/web3.js'
import { transfer } from '@solana/spl-token';

import bs58 from "bs58"

const privateKey = "THE_PRIVATE_KEY_AS_A_STRING"

const fromWallet = Keypair.fromSecretKey(bs58.decode(privateKey));

const signature = await transfer(
    connection,
    fromWallet,
    fromTokenAccount.address,
    toTokenAccount.address,
    fromWallet.publicKey, // or pass fromPublicKey
    amount * Math.pow(10, 6) // tokens have 6 decimals of precision so your amount needs to have the same
);
Like above, the signature variable will be a string containing the ID of the transaction you sent.
The you can use the same code as above to wait for the transaction to complete.
And that's it 🎉
Thank you for reading this article

